Version
- Getting started
- Overview
- Installation
- Commands
- Lightning approach workflow
- Configuration
- How to use
- Fingerprinting options and staging environments
- S3 asset uploads
- Overview
- Example Sinatra app
- Example Node app
- Custom adapters
- Overview
- Existing custom adapters
- Index adapters
- Asset adapters
- Tagging adapters
 Improve this page
Lightning approach workflow
ember-cli-deploy is built around the idea of adapters for custom deployment strategies but for most people the approach Luke suggest in his talk will be a perfect fit.
To use the Lightning-Approach workflow from Luke’s talk you will also need to install the redis- and s3-adapters for ember-cli-deploy:
npm install ember-deploy-redis ember-deploy-s3 --save-dev
Please watch Luke’s Talk before using this project!
The TL;DR of the talk is that you want to serve your bootstrap index.html that Ember-CLI builds for you from a Key-Value store via your Backend and serve the rest of your assets from a static file hoster like for example S3. This is a sketch of what this Addon gives you out of the box:
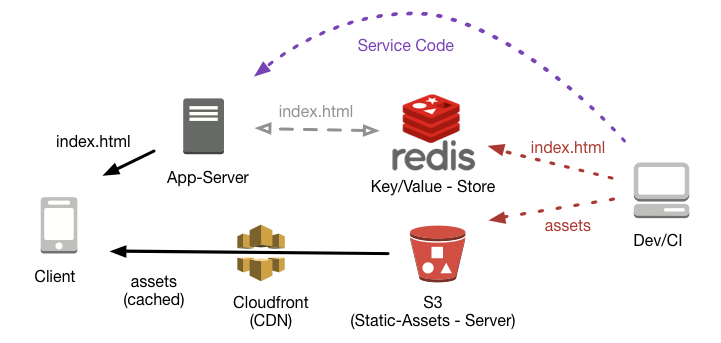
A deployment consists of multiple steps:
- Build your assets for production via
ember build --environment production - Upload assets to S3.
- Upload your bootstrap index.html to a key-value store.
- Activate the uploaded index.html as the default revision your users will get served from your backend.
If you don’t install the redis- and s3-adapters you will need to use a custom adapter you or the community have written. Please have a look at the Custom-Adapters section of this README for further information. In essence your custom adapters will implement the same steps as for the Lightning-Approach but you can customize the different steps as you see fit.